First month for free!
Get started
Published 10/18/2025

Adding a text-to-voice feature to your Android app isn't just a cool gimmick—it’s a massive upgrade that makes your application more accessible, engaging, and genuinely useful in a crowded market. It’s all about giving your app a voice, literally, and opening the door to hands-free experiences.

When you weave text-to-voice (TTS) into your Android app, you’re doing more than just adding a feature. You're fundamentally shifting the user experience from purely visual to auditory, which brings some serious benefits in accessibility, user engagement, and making your app stand out.
Adding a voice to your app can unlock significant growth. Here's a quick look at how this one feature can translate into tangible benefits for both your users and your business.
| Benefit | Impact on Users | Business Advantage |
|---|---|---|
| Enhanced Accessibility | Opens the app to users with visual impairments or reading disabilities like dyslexia. | Expands your total addressable market and builds brand loyalty through inclusive design. |
| Hands-Free Operation | Allows users to interact with the app while driving, cooking, or exercising. | Increases daily active use and integrates the app more deeply into users' routines. |
| Improved Engagement | Turns passive content (articles, notifications) into an active, listenable experience. | Boosts user retention and "stickiness" by offering a more convenient way to consume content. |
| Market Differentiation | Provides a unique selling point that competitors may lack. | Attracts new user segments and provides a clear advantage in a competitive app landscape. |
As you can see, the value goes far beyond just reading text aloud. It’s about creating a more versatile and inclusive product that people can rely on throughout their day.
The most immediate and powerful impact of TTS is on accessibility. Think about it: for someone with a visual impairment, an app without voice functionality is basically a brick wall. By converting your app's text into spoken words, you're not just adding a feature; you're making your app genuinely usable for a whole new audience.
This isn't just about ticking a compliance box. It’s about smart, inclusive design that grows your user base.
The demand here is massive. The global text-to-speech market is on track to hit around USD 9.98 billion by 2029. This growth is fueled by the needs of an estimated 2.2 billion people globally who have vision impairments or reading challenges. You can dig into more data on this expanding market to see just how big the opportunity is.
Beyond accessibility, adding Android app text to voice capabilities caters directly to how people live today—always multitasking. There are countless moments where looking at a screen is difficult, unsafe, or just plain inconvenient.
Someone driving can have your app read them important updates without taking their eyes off the road. A person in the kitchen can follow a recipe step-by-step without getting food all over their phone. An athlete can listen to workout cues or progress reports while on a run.
This kind of hands-free convenience makes your app incredibly versatile and weaves it into the fabric of a user's daily life.
By enabling hands-free interaction, you’re not just adding a feature; you’re creating new opportunities for engagement. Your app becomes a companion during activities where visual attention is impossible, significantly increasing its utility and stickiness.
Before we can make our app talk, we need to do a bit of prep work in Android Studio. Getting the project set up correctly from the start saves a ton of headaches later on. This really boils down to two key things: adding the right tools for networking and telling the Android system what our app needs to do.
Think of it as laying the foundation. A solid setup makes the rest of the build process go so much smoother. Let's get our hands dirty.
Our app needs a way to talk to the Lemonfox.ai API over the internet. The go-to library for this in the Android world is, without a doubt, Retrofit. It makes handling API calls so much cleaner. We'll also need a way to process the JSON data that comes back and forth, and for that, we'll use a Gson converter.
You'll pop these into your app-level build.gradle file. If you're new to Android, this file is basically the recipe for your app, telling the build system what ingredients (or libraries) it needs.
Here's where all the magic happens for managing your project's third-party tools.
Inside the dependencies block, you'll need to add lines for:
With these two in place, our app can now communicate effectively with pretty much any web API. It’s an essential first step for any app that needs to pull data from or send data to a server.
Next up, we have to let the Android operating system know that our app plans to use the internet. This is a security and permissions thing, and it's all managed in a file called AndroidManifest.xml.
Forgetting this step is a classic rookie mistake. Your network calls will just fail silently, and you'll be left wondering why nothing is working. It’s a simple one-liner, but it's absolutely critical.
A Quick Tip from Experience: Always declare permissions in your manifest first. Even with modern Android's runtime permission requests, you still have to declare core permissions like internet access here. It’s non-negotiable.
Just add this tag inside your <manifest> block, making sure it's outside the <application> tag:
<uses-permission android:name="android.permission.INTERNET" />
That's it. This line gives your app the green light to open network sockets and talk to the outside world.
Once you sync your Gradle files and save the manifest, your project is officially prepped. You've built a solid foundation, and now we’re ready to dive into the fun part: writing the code to connect to the Lemonfox.ai TTS API.
Alright, your Android project is set up. Now for the fun part: making it talk. We need to build a bridge from your app to the Lemonfox.ai cloud, which is where the real magic happens. This connection is what will turn your plain text into listenable audio.
The whole process boils down to two key things: authenticating your app securely and then sending a properly formatted API request.
This diagram gives you a bird's-eye view of the flow. Your app packages up the text, sends it off, the API does its thing, and then streams the audio right back.
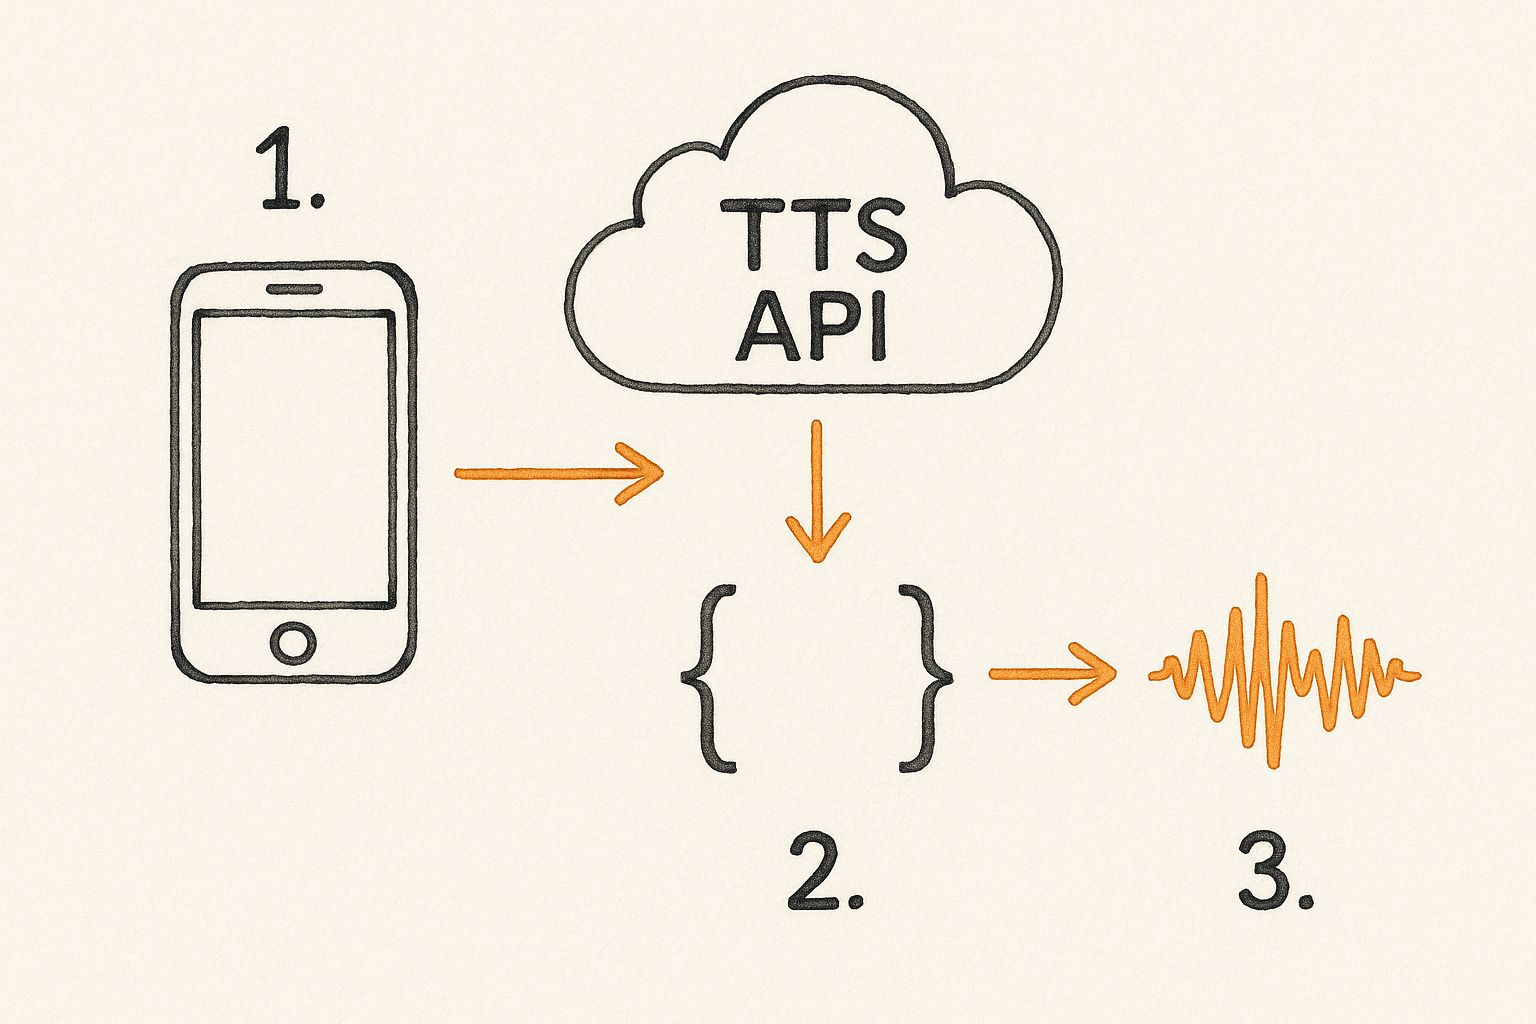
As you can see, it’s a pretty straightforward trip: a JSON payload goes out, and synthesized audio comes back. Let's break down how to make that happen.
Before you can make a single API call, you'll need your API key from the Lemonfox.ai dashboard. Treat this key like a password. If it leaks, anyone can use it to make requests on your account, which is a fast track to unexpected bills and security headaches.
Whatever you do, don't hardcode the key directly into your activities or view models. That’s a huge security no-no.
A much safer way is to store it in your local.properties file. This file is specifically designed for sensitive, local-only credentials and is already included in Android's default .gitignore, so you won't accidentally commit it to a public repository.
Pro Tip: Always double-check that
local.propertiesis listed in your.gitignorefile. Keeping secrets out of your git history is one of the first and most important security habits to build. This is especially critical when you're building an android app text to voice feature that relies on a paid service.
With your key safely tucked away, it's time to build the actual network request. My go-to library for this in Android is Retrofit because it makes the whole process clean and manageable.
You'll need to define a Retrofit interface that lays out the API call. It will look something like this:
@POST annotation pointing to the specific URL for Lemonfox's TTS service.@Header annotation to pass it for authentication on every request.@Body annotation, which keeps your code nicely organized and type-safe.The market for this kind of technology is absolutely exploding. The voice-to-text market on mobile was valued at around USD 22.2 billion in 2025 and is projected to skyrocket to USD 183.5 billion by 2035. With over 6 billion smartphone subscriptions worldwide and massive leaps in AI, the demand is only getting stronger. You can discover more insights about this growing market and what's driving it.
Once your Retrofit interface is defined, you can finally make the call. When you trigger the function, Retrofit sends your text payload over to the Lemonfox.ai API.
Now, here’s a key difference from many other APIs: a successful response isn't a neat little JSON object. Instead, you get back a raw stream of audio data, usually in a format like MP3.
Your app has to be ready to catch this stream of bytes. Retrofit handles this beautifully if you set the return type to ResponseBody. From there, you can take that raw data and get it ready for playback. We'll dive into how to actually play that audio through the device's speakers in the next section, closing the loop on our TTS feature.

Getting the audio data back from the API is a great first step, but it’s really only half the job. The true measure of a great android app text to voice feature is how well it actually plays that audio for the user. This is where we dive into handling the raw audio stream and crafting a smooth, reliable playback experience.
It’s about more than just hitting a "play" button. You've got to think about the audio's entire lifecycle, give the user clear feedback on what's happening, and make a smart decision on how to handle the data itself.
For the core playback logic, Android’s built-in MediaPlayer class is your best friend. It’s a powerful and battle-tested tool that can manage everything from preparing the audio source to stopping it cleanly when the user is finished. Honestly, it’s the bedrock of most solid audio features on the platform.
Think of MediaPlayer as giving you a standard remote control for your audio. It provides all the essential functions users have come to expect, which lets you build a familiar and intuitive UI.
Wiring these controls up is non-negotiable. Users expect them. An app without these basic functions feels clunky and unfinished, so it's a critical part of the user experience.
A Quick Tip from Experience: Always, always release your
MediaPlayerinstance when you're done with it. A great place for this is in your Activity’sonDestroy()method. If you forget, you’ll create memory leaks and resource conflicts that can lead to bizarre crashes and unnecessary battery drain. I've seen it happen plenty of times.
Once you get that audio stream from the API, you hit a fork in the road. Do you stream it directly as it comes in, or do you download it to a temporary file first and then play it? The answer really boils down to what your app is trying to do.
Each method has its own set of trade-offs that affect performance, user experience, and how your app uses the device's resources.
| Approach | Best For | Pros | Cons |
|---|---|---|---|
| Streaming | Long-form content like articles or audiobooks. | Playback starts almost instantly, which feels fast to the user. Doesn't eat up device storage. | Completely dependent on a solid internet connection. Buffering can kill the experience. |
| Downloading | Short, repeatable audio like notifications or UI sounds. | Playback is guaranteed to be flawless once downloaded. Audio can be cached for offline use. | There's an initial delay during the download. Uses more temporary device storage. |
Let's think about a real-world scenario. For a news app that reads articles aloud, streaming is a no-brainer. Users can start listening right away without waiting for a massive file to download. But for a language-learning app that plays short, repetitive phrases? Downloading to a temp file is way more efficient. It ensures crisp, instant playback every single time the user taps the button.
Whatever you do, don't leave your users staring at a silent, static screen. While the app is busy fetching and preparing the audio, it’s absolutely crucial to let them know something is happening. A simple loading indicator or a progress bar can make the whole process feel much faster and more professional.
When the API call is out, show a loading spinner. If you've decided to stream, you can hook into MediaPlayer's onBufferingUpdateListener to show how much audio is ready to go. This tiny detail stops people from thinking your app has frozen and dramatically improves their perception of its performance. It’s a simple trick, but it’s a powerful way to build trust and keep them engaged.
https://www.youtube.com/embed/6i0cXSvyz98
Getting your app to speak is just the first step. The real magic happens when you move beyond the default settings to craft a voice that actually fits your brand and sounds natural to your users. A generic, robotic tone can feel clunky and cheapen the user experience, while a thoughtfully customized voice makes your app feel professional and immersive.
This is where the Lemonfox.ai API really shines. It gives you a ton of control to shape the audio output, letting you dial in the exact sound you're going for. Programmatically adjusting these characteristics is what separates a basic android app text to voice feature from a truly high-quality one.
And this isn't just a "nice-to-have" feature anymore. The global text-to-speech market was valued at USD 4.55 billion in 2024 and is on track to hit an incredible USD 37.55 billion by 2032. This explosive growth is all thanks to AI that can produce incredibly expressive, human-like voices. If you want to keep users engaged, personalization is key. You can read the full research about these market trends to see just how big this opportunity is.
To really nail the audio experience, think about the context. A newsreader app probably needs a clear, slightly faster speaking pace. A meditation app, on the other hand, calls for a much slower, calmer tone. You can control all of this with a few simple API parameters.
Here’s a quick look at what you can tweak in your API calls:
1.0 is the baseline. Bumping it to 1.2 makes it 20% faster, while dropping it to 0.8 slows it down by 20%.A Quick Tip from Experience: When you're first experimenting, start small. A tiny adjustment of just 10-15% to the rate or pitch can make a huge difference in how the voice is perceived. If you push it too far, you’ll end up with something that sounds cartoonish and unnatural.
Playing with these parameters helps you create a unique audio identity that sets your app apart.
To give you a clearer picture, here's a quick-reference guide to the key parameters available for tailoring the synthesized voice output.
| Parameter | Description | Example Values |
|---|---|---|
| voice_id | Selects a specific voice profile from the available options. | eva, adam, aurora |
| rate | Controls the speaking speed. Values less than 1.0 are slower, greater than 1.0 are faster. |
0.8 (slower), 1.0 (normal), 1.2 (faster) |
| pitch | Adjusts the baseline pitch. Values less than 1.0 are lower, greater than 1.0 are higher. |
0.9 (lower), 1.0 (normal), 1.1 (higher) |
These options are your toolkit for creating a polished and professional-sounding voice.
Great-sounding audio is one thing, but your TTS feature also has to perform well in a production environment. It needs to be fast, reliable, and efficient. You can't just blindly fire off API requests for every snippet of text—that's a recipe for slow performance and a high bill.
Here are a couple of must-do optimizations:
This is the single most effective thing you can do. For text that never changes—think button labels, welcome messages, or tutorial instructions—generate the audio once and save the resulting MP3 file right on the device. The next time you need to play that audio, you just grab the local file. This completely eliminates the API call, drops latency to zero, and saves you money. It's a huge win.
Things go wrong in the real world. Network connections drop, and APIs sometimes have temporary blips. Your app needs to handle this gracefully instead of crashing. A good approach is to catch potential errors and let the user know that the voice service is temporarily unavailable.
Even better, implement a retry mechanism with exponential backoff for network-related failures. This strategy avoids hammering a failing server with requests and gives the connection a chance to recover on its own. It's a standard best practice for building resilient apps.
As you start adding text to voice in an Android app, you’re bound to run into a few common hurdles. I've seen these questions pop up time and again, and figuring them out early will save you a world of pain later.
Let's walk through the most common challenges developers face, from juggling different languages to making sure your app still works when the Wi-Fi doesn't.
This is a big one, especially if you have a global user base. Thankfully, modern TTS APIs like Lemonfox.ai are built for this.
You’ll typically specify a language and region code right in your API request—think 'en-US' for American English or 'es-ES' for Castilian Spanish. The best approach is to either pull the user's language from their device settings or, even better, give them a language preference option inside your app.
When you send off the API request, just pop that code in. A pro tip from experience: always test the available voices for each language you plan to support. The quality, tone, and style can differ, and giving users a choice of voices is a fantastic touch for personalization.
Keeping costs in check is non-negotiable for any app you want to scale. Your best friend here is caching. Seriously.
Think about all the static text in your app, like a "Welcome back!" message or standard button labels. Generate the audio for those once, save the file right on the user's device, and just play that local file every time after.
Caching isn't just a trick to make your app feel faster; it's a direct cost-saving strategy. You’re cutting down on API calls, which is almost always what you're billed for.
You can also put some simple rate limiting in place on the app side to stop users from mashing the button and running up your bill. Take a look at your analytics, too—see what text gets converted most often and make that your top priority for caching.
Yes, but it requires a bit of planning. Cloud-based APIs, by their nature, need an internet connection to work their magic in real time.
The trick is to create a solid offline experience for any predictable content. You can pre-generate audio files for all your common phrases or essential bits of text. A great time to do this is during the app’s first launch or whenever the user has a stable connection.
Just save those audio files locally. Then, build in a simple check: if the app is offline, it plays the pre-downloaded file instead of trying to call the API. For a full-blown offline TTS that can convert any text, you'd need to bundle an on-device engine, but be warned—that will make your app much larger and the voice quality often isn't as good.
Ready to give your app a voice? Lemonfox.ai offers a simple, powerful, and affordable Text-to-Speech API to bring your project to life. Get started for free today.