First month for free!
Get started
Published 1/14/2026
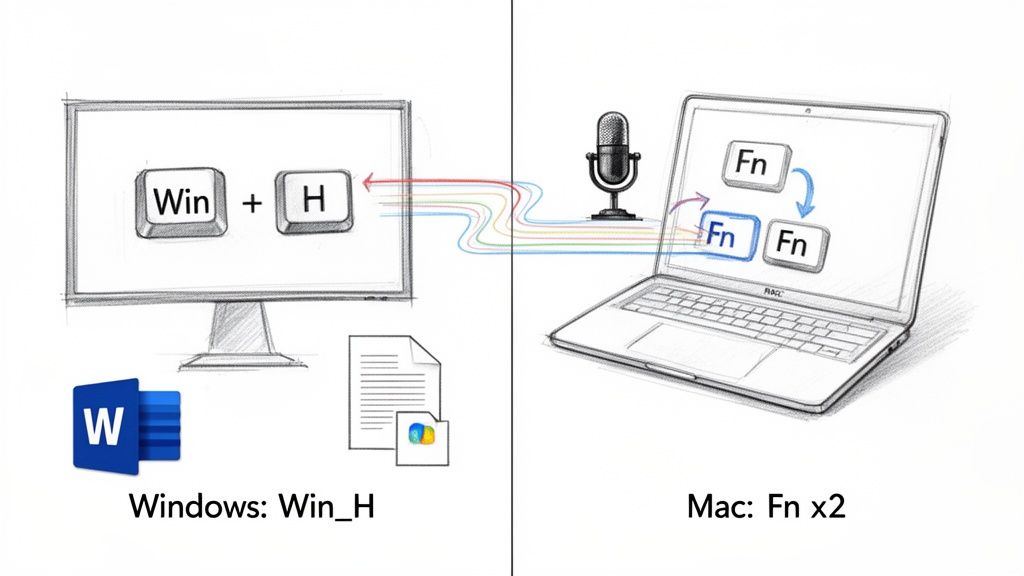
Tired of thumb-typing? The good news is that firing up talk-to-text is usually just a single tap or a quick keyboard shortcut away. On most phones, you just need to tap the microphone icon on your keyboard. If you're on a desktop, a simple combination like Win + H for Windows or a double-tap of the Fn key on a Mac gets you going.
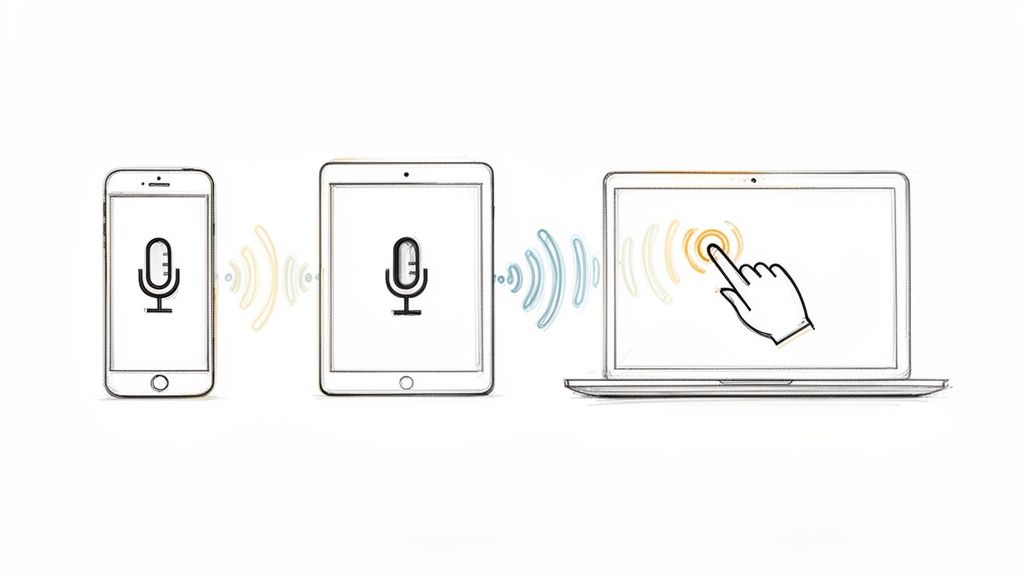
Ever been juggling groceries and needed to send a text? Or maybe you just had a brilliant idea for an email and wanted to get it down before it vanished? That’s where talk-to-text, also known as dictation or voice typing, comes in. It’s built into almost every device you own, but finding the "on" switch can sometimes be the trickiest part.
This guide is all about getting you from thought to text, fast. Whether you're a multi-tasker trying to send a hands-free reply or a writer looking to draft a document without getting carpal tunnel, the first step is always activation.
This handy flowchart breaks down the simple paths to get voice typing up and running on your device.
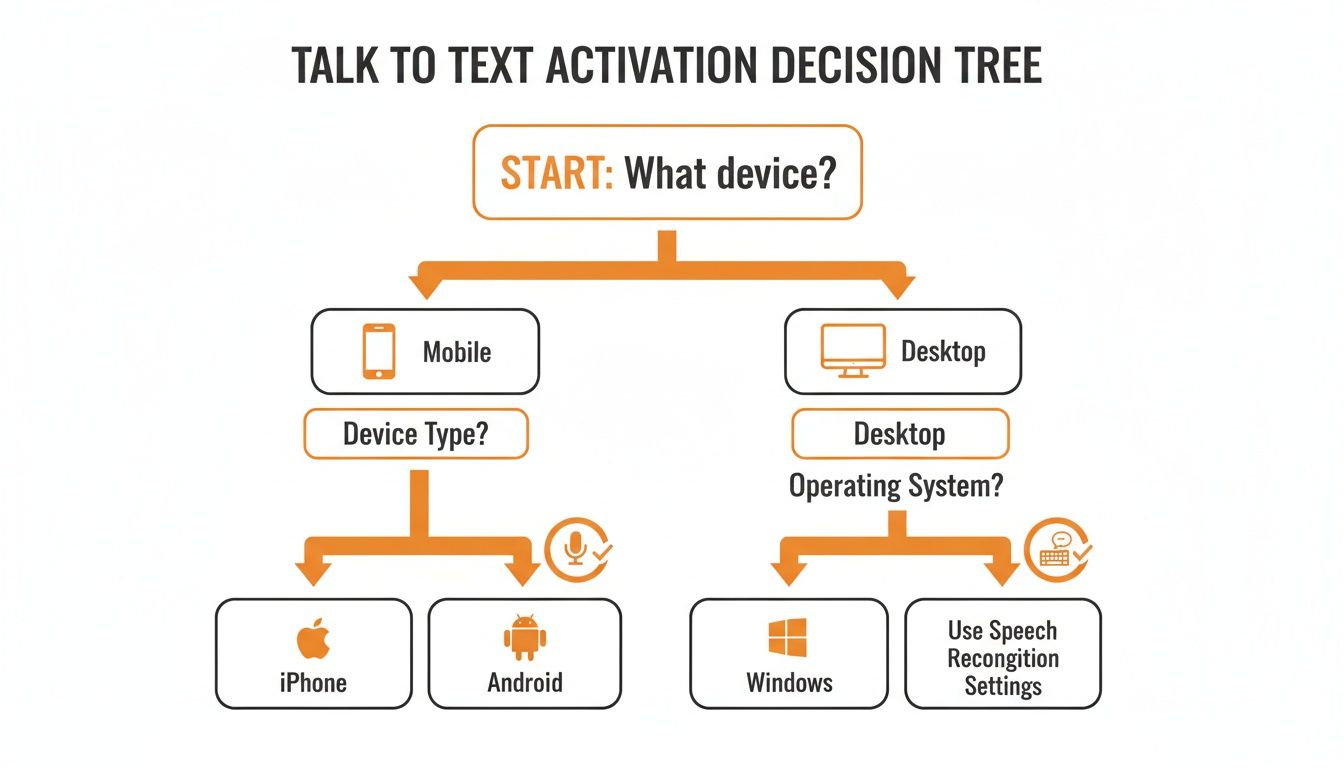
As you can see, it's a pretty straightforward process. The only real difference comes down to whether you're on a mobile device or a desktop computer.
To make it even easier, I've put together a quick reference table. Think of it as your universal remote for turning on voice typing, no matter what device you're using.
| Platform | Activation Method | Where To Find It |
|---|---|---|
| iOS (iPhone/iPad) | Tap the microphone icon | On the bottom row of the default keyboard |
| Android | Tap the microphone icon | On the top right of the Gboard keyboard |
| Windows 10/11 | Press Win + H |
Works in any text field or application |
| macOS | Double-press Fn key |
Configurable in System Settings > Keyboard |
This table should help you get started in seconds. Once you know the shortcut for your go-to device, it quickly becomes second nature.
This shift toward voice isn't just a passing fad. The speech and voice recognition market is projected to skyrocket from USD 15.46 billion to USD 81.59 billion by 2032. This incredible growth is fueled by people just like you asking, "how do I turn on talk to text?" With this feature now standard on over 90% of smartphones, dictation has become a fundamental part of how we interact with our tech. You can read more about the rise of voice technology to see just how big this is getting.
Let's be honest, most of us are glued to our phones. That makes them the perfect place to start using your voice to type. Whether you're trying to send a text while walking the dog or jotting down a quick shopping list with messy hands, getting this feature running is surprisingly simple. The setup is a little different between iPhones and Androids, but both get you talking in just a few taps.
For the millions of us with an iPhone, the feature you're looking for is called Dictation. It's built right into the system, meaning it works pretty much anywhere you can type—Messages, Notes, Mail, you name it.
First things first, you'll need to jump into your iPhone's settings.
Once you're in the Keyboard settings, just scroll down toward the bottom. You'll spot a section for "Dictation" with a toggle switch next to Enable Dictation. Flip that switch on. A little pop-up might ask you to confirm your choice—just tap to approve it.
And that's it. This is the exact screen you'll be looking for.

Once that switch is green, you're good to go. You can also add other languages for dictation right from this menu, which is super helpful if you're bilingual.
One of the best things about Apple's recent updates is that for many languages, the processing happens right on your device. Your voice is turned into text on your phone without being sent to a server, which is a nice little privacy win.
If you're an Android user, the process is just as quick. The exact menu names might vary a bit depending on who made your phone (like a Samsung versus a Google Pixel), but the core idea is the same. Most Android phones rely on Gboard (the Google Keyboard), which comes with fantastic voice typing built-in.
To make sure it's ready for action, here’s the typical path:
Nine times out of ten, when voice typing isn't working, it’s a simple permissions issue. Your keyboard has to be allowed to listen to your microphone, after all.
Pro Tip: If you ever see a grayed-out microphone icon on your keyboard, head straight to your permissions. Go to Settings > Apps > Gboard > Permissions and make sure Microphone access is allowed. This one small tweak fixes the problem for almost everyone.
With everything enabled, you’ll see a little microphone icon pop up on your keyboard anytime you tap into a text field. Just tap it, start talking, and watch the words appear. You can also manage offline language packs from this menu, letting you dictate notes even without an internet connection—a real lifesaver when you're out and about.
Talking to your phone is one thing, but bringing that power to your desktop is where you can really see a boost in productivity. It's perfect for those longer tasks—drafting a detailed email, writing out a report, or even just jotting down notes while you’re on a call.
Getting it set up is straightforward, though the exact shortcuts and menus are a bit different depending on whether you're using a Windows machine or a Mac. Once you know where to look, you'll be dictating in no time.
Microsoft built a pretty solid voice typing tool right into Windows, and getting to it is incredibly fast.
All you need to do is press the Windows key + H. That’s it. A small dictation toolbar pops up at the top of your screen, ready to go. You can use this shortcut pretty much anywhere you can type—a Microsoft Word document, a browser search bar, you name it.
To really dial it in, a quick trip to the settings menu is worthwhile.
That auto-punctuation feature is a lifesaver. It automatically adds commas and periods as you talk, so you don't have to awkwardly say "comma" or "period" out loud. It makes the whole process feel much more natural.
Apple, as you'd expect, has woven dictation seamlessly into macOS. A one-time setup is all it takes to unlock voice typing across all your native apps like Pages, Mail, and Messages.
The first stop is System Settings.
You might get a quick pop-up asking to confirm; just say yes. By default, the shortcut to start dictating is a quick double-press of the Fn (Function) key. You can even change this shortcut right in the same Keyboard settings menu if something else works better for you.
Here’s how I use it: When I'm in a virtual meeting, I'll often have a Pages document open on the side. Instead of trying to type like a madman, I just double-tap the Fn key and let my Mac transcribe the key points for me. I can stay focused on the conversation without missing a single detail.
Learning these simple commands really closes the gap between what you're thinking and what you're writing, turning your computer into a much more efficient machine.
While your operating system’s built-in dictation is great, sometimes the handiest tool is the one that's already open on your screen. A lot of people don't realize one of the best voice-typing features around is built right into Google Docs, and it works on any computer running the Chrome browser.
This is a complete game-changer for drafting long documents, brainstorming ideas, or just getting your thoughts down without being chained to the keyboard. Because it's browser-based, there's nothing to install.
Getting started is incredibly simple. Just open a Google Doc.
From the menu at the top, navigate to Tools, and then click on Voice typing. If you love shortcuts as much as I do, just press Ctrl+Shift+S (or Cmd+Shift+S on a Mac) to pop it open instantly.
You'll see a small window with a microphone icon appear. The first time you do this, Chrome will prompt you for permission to use your microphone—you have to click Allow for it to work. After that, just click the mic icon. It’ll turn red, letting you know it's listening. Now, just start talking.
When you're ready to stop, click the microphone again. You can also drag that little pop-up window anywhere you like, so it's not covering up your text.
Here's how I use it: I frequently use this exact feature to get a first pass on transcribing recorded interviews. I'll just play the audio out loud and let Google Docs handle the initial transcription. It's not perfect, but it saves me a ton of time on the front end.
Where Google's voice typing really shines is with its voice commands. You don't have to dictate a wall of text and then go back to manually add all the punctuation and formatting. You can do it all on the fly, which makes the whole process feel much more natural.
Here are a few of the most essential commands you'll want to learn:
For example, you could say: "Learning how to turn on talk to text is simple period new paragraph" The tool will translate that into perfectly formatted text.
A quick pro-tip: using a decent external microphone instead of your laptop's built-in mic will dramatically improve accuracy. It does a much better job of isolating your voice from any background noise. And if you ever find the microphone icon is missing or grayed out, make sure you’re actually using Google Chrome and double-check that you've given it microphone permissions in the browser settings.
So, you've figured out how to turn on talk-to-text. That's half the battle. The other half is getting the machine to actually understand what you’re saying. We’ve all been there—dictating a perfectly clear sentence only to watch a jumble of nonsense appear on the screen.
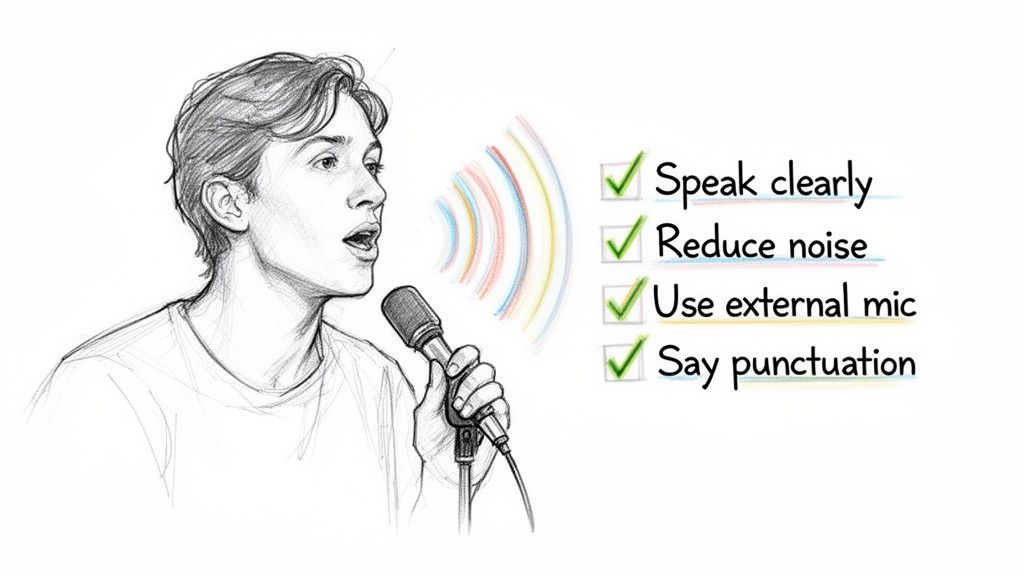
The good news is that you don't need expensive software to get better results. It really just comes down to making a few small, intentional tweaks to your environment and how you speak.
Try to speak like a news anchor. Use a steady, consistent pace—not rushed, but not artificially slow, either. Long, dramatic pauses in the middle of a sentence can confuse the software, making it think you've finished talking, so keep the flow natural.
Clarity is everything. Make a conscious effort to enunciate your words, paying special attention to the consonants at the beginning and end of each one. This single habit makes a massive difference for the algorithm trying to piece your speech together.
Here's the biggest game-changer: learn to speak your punctuation. Instead of just pausing for a comma, say the word "comma" out loud. Same for "period" and "new paragraph." This is a non-negotiable step if you want clean, readable text without constantly stopping to make manual edits.
Your device's built-in microphone is pretty good, but it's not magic. It hears everything, from the TV in the next room to the low hum of your air conditioner. To give it the cleanest signal possible, try to find a quiet spot to do your dictation.
For an even bigger leap in accuracy, an external microphone is your best bet. You don't need a professional studio setup; a simple headset with a boom mic or even a decent pair of earbuds will isolate your voice much better than the tiny mic on your phone or laptop.
This technology is getting better at an incredible pace. The speech recognition market is seeing a 16.3% CAGR from 2023 to 2030, powered by the same AI found in virtual assistants. This isn't just a convenience; industries like healthcare and education are cutting manual transcription time by up to 80%. You can learn more about this growth on Grand View Research.
Most dictation tools are designed to learn from you. The more you use talk-to-text, the better it gets at recognizing your specific voice, cadence, and even the unique names or industry jargon you use all the time.
You can speed up this learning process a bit.
By putting these simple techniques into practice, you’ll find that talk-to-text goes from being a frustrating novelty to a genuinely powerful and reliable productivity tool.
While the built-in dictation tools on our devices are great for everyday use, developers often hit a wall when trying to build more sophisticated voice features directly into their apps. If you're looking for more power, control, and privacy, a dedicated speech-to-text API is the way to go.
Using a specialized API like Lemonfox.ai gives you a level of consistency and power that native tools just can't match. You avoid the classic developer headache of fragmentation—where your feature works perfectly on one version of Android but breaks on another. Plus, you get access to advanced capabilities that simply aren't available out of the box.
So, what are the real-world benefits of opting for a dedicated API over the standard, built-in options? It really comes down to a few key advantages.
This isn't just a niche market; it's exploding. The global speech-to-text API market is on track to hit USD 8,569.4 million by 2030. For developers, this growth means powerful tools are more accessible than ever. With Lemonfox.ai, for example, you can get high-quality transcription for under $0.17 per hour in over 100 languages. You can dig into the full market analysis over on Fortune Business Insights.
Building voice-controlled features or in-app transcription requires a solid development foundation. A great starting point is understanding the complete lifecycle of application creation. You can learn more about how to build a mobile app from idea to launch to get a handle on the fundamentals.
With a simple API call, you can integrate powerful, private, and reliable voice functionality right into your app. It’s a straightforward way to give your users a better experience while you maintain complete control over the data and performance.
Getting talk-to-text turned on is one thing; getting it to work flawlessly is another. Even experienced users run into weird glitches now and then. Let's walk through some of the most common hangups so you can get back to dictating without any friction.
It’s incredibly frustrating when you tap the microphone icon and... nothing. Silence. If your talk-to-text feature seems to be ignoring you, it’s almost always a simple permissions or connection issue.
What about when you have no signal at all? The answer is a solid "maybe."
Both Apple and Google have made huge strides in on-device dictation. For major languages like English, Spanish, and a few others, your phone can now process your speech locally, no internet required. This is a big win for privacy and convenience. Just be aware that the accuracy might take a slight hit compared to the cloud-powered version, and less common languages are usually not supported offline.
This is the one thing that trips everyone up at first. To write a polished sentence, you have to literally speak the punctuation. It feels strange for about five minutes, and then it becomes second nature.
Pro Tip: Stop thinking of punctuation as a pause. Think of it as just another word you need to say. To get the sentence "What are you doing?", you need to speak the words, "What are you doing question mark".
You just say the command out loud. The most common ones are “period,” “comma,” “question mark,” and “new paragraph.” Once you get the hang of it, you’ll be dictating full, properly formatted paragraphs with ease.
This idea of describing what you want is even changing how software gets built. It's fascinating to see how an AI app builder turns ideas into apps by describing them, which feels a lot like dictating a complex thought.
Ready to add powerful, accurate, and private voice transcription into your own apps? With the Lemonfox.ai API, you can integrate top-tier speech-to-text capabilities in minutes. We make it simple and affordable, and we even offer a generous free trial so you can see it in action. Learn more and sign up at https://www.lemonfox.ai.